3d Printed Mini Slingshot Gun 3.0

Video: click here
STL download: click here
Some My Feeling:
Hi, welcome back. This video is about making my 3rd generation of the new mini slingshot blaster. Every time I build a new project I always want to add a new element to it. That can be seen as an experiment platform. Those new designs maybe will be used in the new works in the future.
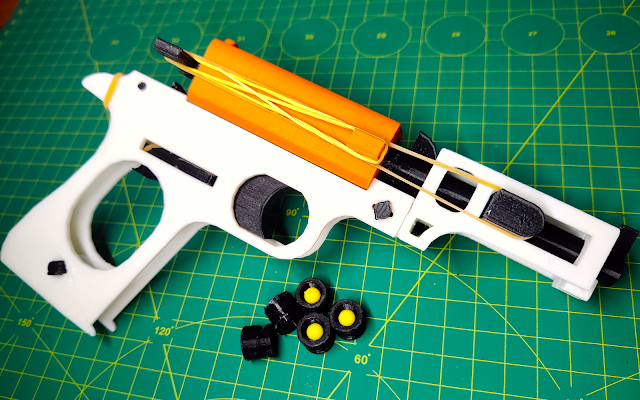
This time I built this blaster. The primary point which I was going to make is a blaster with a magazine and the bullet can be loaded into the magazine just like the real gun style. I think that should be the coolest point in this work. The first magazine I designed on the computer and then printed it. Finally, I was surprised. That’s really good. For this mag, I once wondered which item can be the power to push the bullets up, springs or rubber bands. At first, I wanted to use rubber bands. Because this is my most familiar item but if I use rubber bands, the mag maybe wouldn’t be small enough. So I decided to use springs finally. I once wanted to make 3d printed springs by myself but after I tried it I found that the 3d printed springs were not very easy to make. So finally, I just chose the springs from the pens and after finishing this mag, the result told me, my choice is right. After that, I tried to optimize the first mag and I finally got the mag of the second version.
For the bullet, actually this is a small cylinder and my 2nd generation slingshot gun also uses this bullet. It’s the same size. 6.5 millimeter in diameter and 10 millimeters in length.
To be honest, every time I build a project I’m always afraid of failure. A new mechanism from a 3d model to a real object on the table. We can’t predict if it can work after putting them together from those parts, and mostly from my experience before I always meet the problems in the first test. So this time, once again, I had some problems in the first test. The problem is the bolt part. Fortunately, this time the problems are not very big and it’s not hard to improve those parts.

In order for the bolt to work smoothly, I made 2 parts for the bolt in the first design. The bolt 1 pushes one bullet out and bolt 2 can press the bullet into the mag in order to give bolt 1 a way where the bolt 1 can come to behind the bullet from the front because if the bolt 1 wants to eject the bullet, it needs to be at the back of the bullet. So if the top one in the barrel tail and it was not pressed back into the mag, it will block the pathway of bolt 1. This is my first try to make this design so finally it looks like it’s a kind of complicated part in this slingshot gun and it results that the bolt can’t work well. Therefore, I need to re-start to make a new design and solve those problems.
In the second design, I reduced the amount of the bolt part from 2 pieces to one piece. I removed the bolt 2 and gave bolt 1 some modifications. It was mostly about adding a slope in the bolt in order for the bolt to be pulled easier to the trigger position and at the same time this slope can press the bullet into the mag automatically. Very simple but very useful. Until the new design was finished successfully, I just found that I was thinking more in the beginning. It’s not necessary to use the bolt 2 part. And then giving my new blaster some final improvements which make it better and changing those new parts for this slingshot gun. And now, we got this new 3rd generation slingshot blaster. At this moment, we finally arrived at the time to do the shooting test.
Actually the shooting test is really good but after changing the mag many times there are some little parts that are broken from the gun’s body. This is a part of the magazine well so after this part was broken, the mag is a little loose on the gun but fortunately still can shoot well and it’s not a very big problem.
print setting:
FIles names: body1&body2


FIles names: bullet


FIles names: handle


FIles names: mag release+ & bolt+ & trigger


FIles names: magazine1 type-1 & magazine2+++ type-1 & magazine3 type-1 & pin1+ & pin2+


FIles names: magazine type-2 1 & magazine type-2 2+ & magazine type-2 3 & pin1+ & pin2+


FIles names: pin3&pin4&pin5+&pin6+


Rubber Bands and Hardware
 |
| rubber bands size |
 |
| copper hexagon socket screw (M3*6) |
 |
| copper nuts (m3*5*5) |

Comments
Post a Comment